Monday, May 27, 2013

My First Mixed Media Canvas Projects...

I have become fascinated with some of the Mixed Media projects that I have been seeing around Pinterest.  Since I had many of the products already in my stash to try it without having to spend a bunch, I jumped right in.  I went around the house, yard and garage to pick of some "items" to include in my first project.  You never know what you'll find.  I came up with a shoebox full of items to choose from.

This first canvas is using a picture of Connor and Shadow.  I have wanted to scrapbook this picture with a title of "Me and My Shadow" since I took it.  Figured I'd use it for this project since it was one that really captures how close these two are.  It's hard to believe that he was scared of her as a puppy but 2 years later they are inseparable when he comes over.


I just glued a bunch of items that I found around the house/garage/yard to a canvas then started spraying inks and mists to create the Ombre colorization.  Couldn't make the transition from white to blue as well as the other colors transitioned so I decided to stop before I wound up with something I couldn't fix.


I used Puffy Stick On Letters to create the words Me and My Shadow. 
Mom thought I should highlight the words so they stood out more,
but I this type of project is supposed to be more like
an Eye Spy project, the more you look - the more you see.

These pictures were taken while it was hung on the wall so I couldn't get a very good picture of the top details so I took pictures of the bottom details just to show you the different "findings" I used.
There is a "Guardian Angel" pin  added over a heart to symbolize how protective Shadow is of Connor.  The Flower is an old button that was all scratched up, the stem is a dowel plug and the leaves are some jewelry beads.  under this corner I used a piece of cardboard that had the top layer torn to show the corrugation. 

Here I added a Tim Holtz Time clock.  The hands are pointed towards the 20 seconds at the bottom and 1 O'clock at the top.  They were set that say to document the year  2013 (1 o'clock is 13 hundred hours military time).  The Cherish tag was added last because I was too impatient to wait for things to dry and was using the heat gun, a little piece of the photo melted and had to be covered...I thought this tag would be appropriate.

This is the side of the canvas, there is a felt doghouse  and a doghouse charm, more buttons, beads, and other oddities you find in a junk drawer.  The "hook" on the bottom right is used for hooking the window shades strings to the wall.  I put it there so I can hang the "clicker" that we use when training the dogs...Connor loves to play hide and seek and would use the clicker to call the dogs when he was hidden. 


The texture on the photograph is from spraying polyeurathane on the whole piece to seal it.  This gives the picture that "mat" texture instead of a glossy finish.

This is the type of art that you either like or don't...and I'm really starting to like it a lot....so there will be more to come.

Freda

Sunday, May 19, 2013

3D Father's Day Gift Box


Here's my May posting for the Cricut FANatics Blog.....


Hi, it's Freda from CannCreate Designs, I'm back with a quickie 3D Father's Day gift box project using SVG files, MTC and my Expression. 

I was looking for a gift box for my hubby's father's day gift.  He has been wanting a new wallet so I though the size of this box would be perfect...


This project comes from "The Green Room" set at SVGCuts.com.  I was really amazed at how easy and quickly this project came together.

For the top I found this great green velvety specialty paper from HOTP called Forest Suede at my local LSS that cuts like butter.  Just to be certain I taped it down all the way around so I didn't waste an ounce......


I assembled the top before I decided the "balls" looked a little flat.  So I would advise that you assemble the rack of balls and embellish before attaching to the table....I was a little worried that I was going to mess up the suede.  Draw stripes and dots on the ball pieces, assembled rack base and frame then glued the balls in place on the rack base piece.  Place rounded blobs of Glossy Accents on each ball to make them look a little more realistic....let dry...


Use a tape runner adhesive to attach the velvet to the table top base. Next put the table top frame in place and embellish as desired.  (I put Queen & Co. black gems in the holes around the edges).  Draw the embellish lines (gold and black stripes) and color the chalk tip white on the stick, allow inks to dry then color the white tip with a little bit of blue on the end. Fold the stick along the scored lines and glue (it will be a square shaped tube). There are 2 holes in the suede to help with placement of the ball and stick, I placed a pearl on one and glued the stick to cover the other one...

Fold the sides of the table top under and glue in place.  Glue the "fringe" pieces along the long side (there aren't any pieces for the short sides of the top).  I put Queen & Co. large black pearls just above the holes cut in the fringe pieces.


For the bottom of the table fold the "Box" pieces and glue to form the table base, they are pretty self-explanatory.  Glue the 3 straight and scalloped trim layers together and glue in place on the leg pieces.  Attach the leg pieces to the long sides of the box.


Wallah....you're done....What Fella wouldn't enjoy getting a gift in something this special.....I thought this project was pretty special as a gift box...but last week someone made the bottom of the table and filled it with flowers to look like a planter-I thought it was even more amazing....check it out here...
  

Thanks for stopping by, 

Freda


Designed by:  Freda Cannon 
Machine Used:  Cricut Expression
Project Type:  3-D Gift Box
Products Used:  MTC Software; The Green Room SVG Files from SVGCuts.com, Glossy Accents, Queen & Co Pearls and Black Gems, Ink Gel Pens.

Sunday, May 12, 2013

Mega Meet Goodies....

Hey there, hope everyone had a great Mother's Day.  Thought I'd pop in with some pictures of the cards I made on Thursday while at the Mega Meet in Novi Michigan.  My friend Allison and I had a great time and I got to see Tim Holtz and get my stamp sets and Ink tool autographed.  We just wished we had more time to go, maybe next year.

These items are from my Heartfelt Creations card classes.  I love this company and enjoy a class or two they offer every year....I took 2 card making classes this year so I can stock up my dwindling card stash.


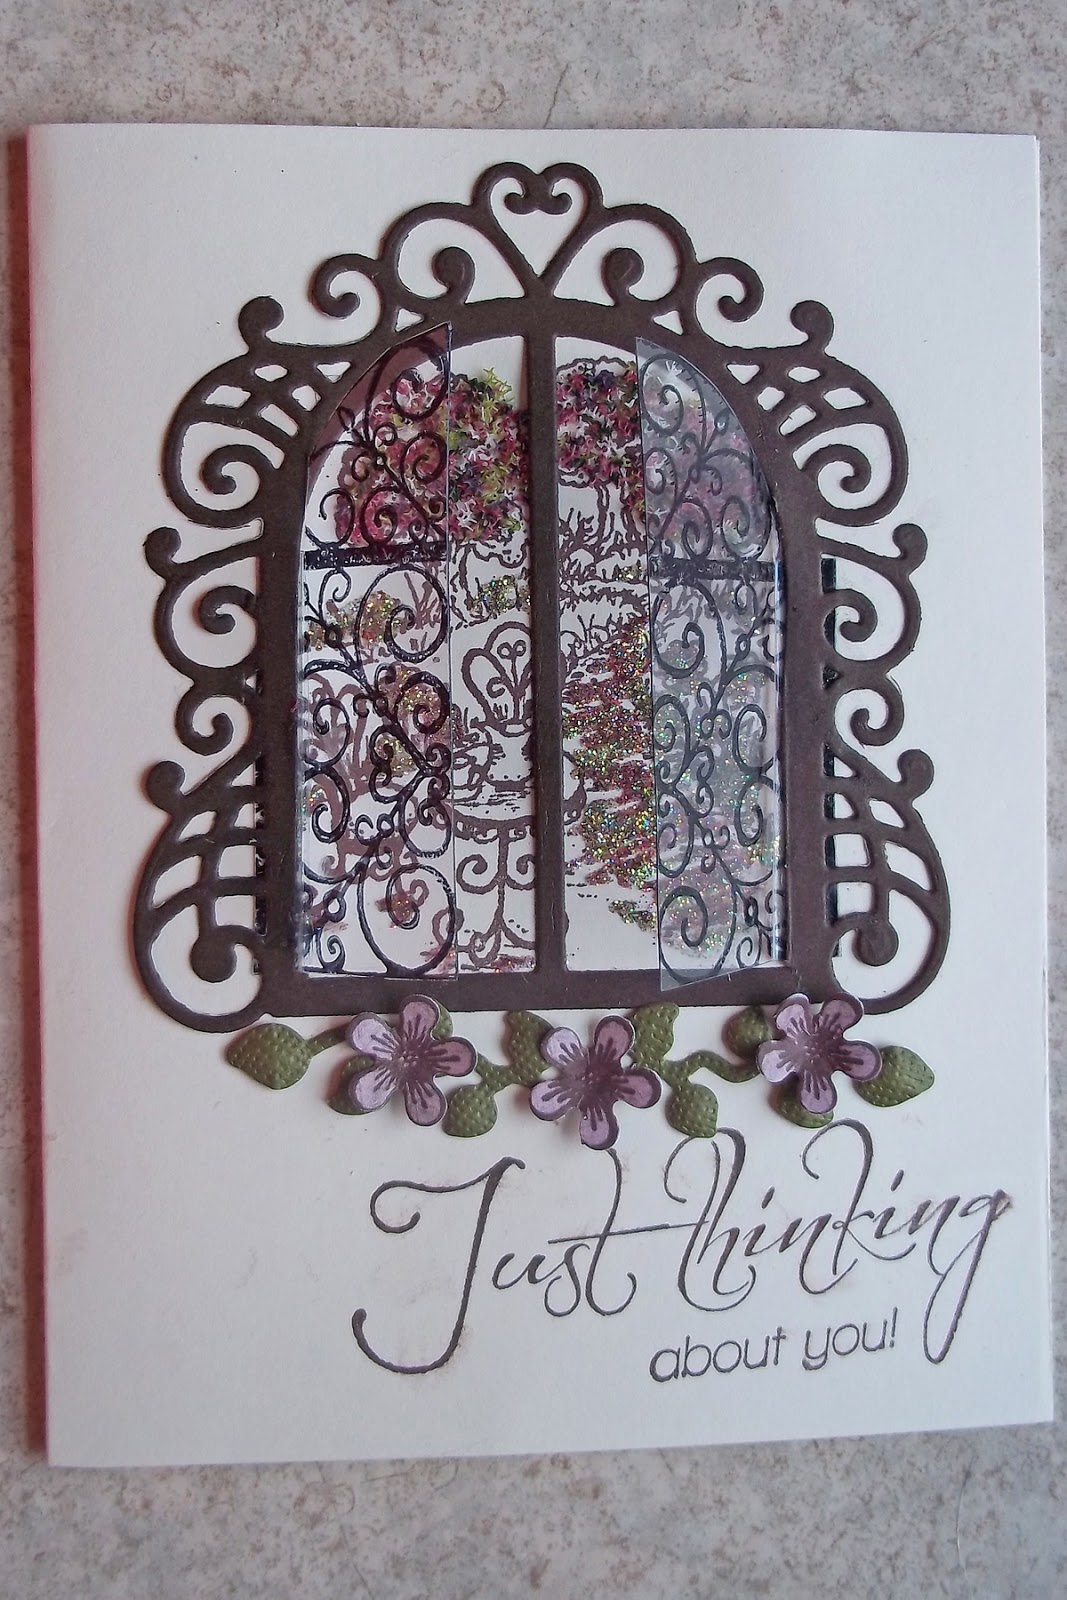
This is the first card in the second class...you can't see it very well, but there are acetate "windows" which are slightly open. We used variegated flower soft on the trees, green and autumn colored glitter on the flowers, grass and pathway.  I never would have though to color with glitter, always used markers...so this was my "new" technique that I learned.

 
Next we have a feminine lacy gatefold card.  I really love the velum embossed flower.  I added some cotton candy stickles and a queen and company flower shaped Goosebumps to the center of the flower.

 
This step card was really quick and looks quite elegant, the photo doesn't do it justice.  Lots of sparkly glitter on the butterfly, flowers and leaves.
 

This was the first card we made in the other class, we learned how to ink, shape and embellish the flowers and leaves.

 
 Below is a close up of the "shattered glass" embellishment on the flowers.


This flowerpot card was a big hit in the class...I decided to use some "Bling" for the flower centers after the air conditioning flipped my scratch paper full of glitter all down the front of me....lol...You could say I had quite the "sparkling" personality the rest of the day...

 
Here's a pic with the gift card out of the pot...I left the stamping off so I can use sentiments appropriate for the occasion when I give it...

 
This card was a very quick yet elegant card.  The class ran a little long so I had to assemble the rest at home...I thought the swirls needed a little pen work and some pearls...


I also took a PK Glitz class where I made 2 tags, since the floral and leaves were acetate and glitter, I waited until I got home to assemble them with liquid glass, they are still a little damp so I'll get them photographed later.

I really wanted to take the PK Glitz vintage hues class which made "vintage looking" glittered cards with acetates.  I double booked myself so that I could get the kit for that class to work on at home, but haven't had time to get to it yet. 

The other class I took was the Queen and Company Trunk Show....oh my!!!  My mouth was watering at all that bling.  This is the first year I took that class but it won't be the last!!!  I think I'll add this class to my list of MUST HAVE classes along with the Heartfelt Creations classes.

Thanks for stopping by...

Freda

Thursday, April 25, 2013

Using My Tim Holtz Sutff....my first projects....

I cannot believe the weather....70 one day snowing the next....Well that's Michigan for ya.....lol

Since I couldn't get back outside and work I decided to play with my Tim Holtz stuff....This is my take on a tag I liked on Scrapbook.com.  (Click here to see the original tag)


Dang, I forgot to put the "wire smoke" on the little green house...I'll have to do that soon....  The flower at the top was colored using the enamel technique and the melting pot (put a Melting Pot Project Craft sheet in an empty melting pot...preheat to Utee setting...place metal object on craft sheet allow to heat up for a bit...sprinkle with embossing powders and watch the magic happen.  When the embossing powder has melted lift the craft sheet by wings and set aside to cool) ...I love how it makes these metal embellishments look.  Tim Holtz's embossing powders are solid colors all the way through, some other brands are white core so they give a mottled appearance when they melt.  The green on my leaves were done with a white core embossing powder....LOVE IT!!!


The metal embellishments were added once I decided the card needed a little something more...the flowers on the deer don't match to well...so I'll take a post it note and slide it under the bottom layer of petals and color them with a distress marker until they are better matched...  The deer were cut from grunge paper, inked with distress ink in Vintage Photo and quickly covered with gold Perfect Pearls...I'm thinking their edges need a little more "inking" so they stand out a little more from the tag. 
 
I don't think this is too shabby for my first card...it can only get better from here....right!!!
 
 
I couldn't sleep so about 4 this morning I got up and started working on this project...I saw a podcast on ITunes from Scrap Time...it was episode #845.  She was putting together a Make n Take she had gotten from Tim Holtz at this year's CHA.  One of these days I'll have to go to a CHA show...that would be heavenly....
 
Here's my take on using the a New Cabinet Card for a home décor project....(once again, I didn't have some things they used, so I made due with what I had)...
 
 
My favorite feature on this piece is the filmstrip...I heated the ends with a heat gun then curled them ...the neat thing about the film strip is that if I didn't like how it looked when it cooled I just heated it again and it would straighten right out....I think I heated each side 2-3 times before I liked the way it looked...
 
 
Well that's all for today...I'm off to the grocery store....
 
Thanks for stopping by...
 
Freda


Friday, April 19, 2013

WANTED HOME DECOR PROJECT AND GIVEAWAY!!!!!

Here's my Cricut FANatics blogpost for April:


Hey there, it's Freda from CannCreate Designs with another 3D project

from SVGCuts and MTC using my Expression.

This project has was made for the top shelf area of my scraproom desk...
makes me smile every time I look at it.


As soon as I saw the Happy Trails set of designs I knew I had to make it using a picture taken at Sears years ago of my grandson in a hat.  The wanted poster was originally intended to be a card, but I wanted it on a 12 x 12 canvas so I enlarged the file to fit the canvas. I purchased the Sasparilla Collection papers by October Afternoon to use because I LOVE the comic strip cowboy paper included in it.
 
Paint the sides and a little on the front of the canvas black and let dry. Trim the background paper to 11 3/4" and apply to the canvas with Mod Podge and let dry*.  Use Black StazOn to ink the edges of the paper once dry. 
 
*NOTE:  In a previous project years ago where I used Mod Podge and didn't allow each layer to completely dry before adding next layer I wound up with bubbles and buckling of the papers once the final project was completely dry.  I flip the project over and brayer the open area of the canvas and use the Cricut spatula to rub under the wooden frame area.  I haven't had any bubble issues since using this technique.
 
Enlarge the Paper, Text and Frame files from the Wanted Poster Card folder to fit on the 12 x 12 Mat angled slightly then cut it out.  (Be sure to cut your frame and text out before printing your photo, you will need to measure the area of the frame you cut to get the correct size for your final picture...speaking from experience....lol.  Ink the edges of the Paper file and mod podge to the canvas and allow to dry.

I'm so glad I bought the digital files so that I could tinker with it.  I had the photo reprinted on matte paper but found it was to "new" looking for this project.  So I opened it in Photoshop and ran the wanted poster action from Panos Effects Old Papers Action Set which I had purchased years ago, you could also use the built in Sepia tone action since the final product you're looking for is the photo.  I used the Wanted poster action because you can try out different items like bullet holes, stains, nails and cracks etc. for cool effects on your picture, if you don't like them you just hide or delete them.  When the photo looked "right" to me I cropped the file down to just the photo approximately 1/2" larger than the size needed for the area on the frame where it will be placed which you cut previously.  I printed the photo on cardstock and used a pair of decorative scissors to trim the picture down to approx. 6" squarish , distressed the edges then inked with StazOn.

Assemble the frame, text and picture layers then mod podge it to the "Paper" layer.

I thought the frame still needed a little something extra so I braided 9 strands of jute into a large flat braid and placed it around the sides of the frame, and a small braid for the hanger.

 
I stapled the start of the braid at the top of the frame and glued it around the sides with Zip Dry adhesive.  I trimmed the excess and stapled the other end where they met. I didn't like the appearance of the staples so I cut some jute to create a "fuzz", spread Zip Dry over the stapled area and pressed the fuzz into it...now you can't see the seam or staples.  I also did this to cover the staples on the hanger so they wouldn't scratch the wall when I hung it up...  I used large rubber bands around the outside to hold the braid in place while the glue dried.


The tag was made using Tim Holtz Distress Inks on a manila tag from the office supply store.  The lettering & banner came from Sizzlits dies Typeset and Tattered Banners.  The heart was a grunge board shape that I inked and fiddled with for 2 days to get it just right then couldn't wait for it to dry naturally.  I used my heat gun and wound up getting to close and suddenly had volcanic like eruption of paint and ink-My beautiful heart was broken.  I thought about it for a minute then covered the entire thing with red glitter, then drew lines of glue across the heart and applied gold glitter....let it dry without the heat gun.  The next night I applied Glossy Accents thickly and let it dry for a couple days.  Add a jute string and "fray" the ends and your tag is ready to be added using pop dots.

The boot and the pot were assembled using the video instructions on the SVGCuts.com website.  The boot itself was a little tricky on the front area, but they explain it quite well in the video...I couldn't even begin to explain.  Unfortunately I assembled the boot & pot at a crop and didn't take to many pictures of the assembly process.


You might notice that I changed the orientation of the horseshoe before cutting it out.  My grandma always said if you turn a horseshoe up side down all your good luck falls out...lol...I'm superstitious so I used the software to move the assembly tabs to the bottom of the shoe so my good luck doesn't get poured out...


Now for the Good Stuff-The Give Away:
 
If you would like to try your hand at assembling the boot but don't have the ability to cut one, I cut an extra boot to give away.  This will come unassembled, it has been inked and embossed you just add the glue...lol....
 
Embossing folder not included....it's in the picture so I can remember which one I used

 
Mary has a really detailed video tutorial that you can watch to help you with the steps of assembly and of course I will gladly answer any questions you may have just click the link to see it on Youtube: 
 
 
To win all you have to do is leave a comment on the Cricut FANatics blog post for this project Cricut FANatics Blog ..... Don't forget to put your email addy in the comment section so I can contact you for mailing details....I will put the names in a hat, draw and post the winner Friday, April 26th.  Everyone is welcome to enter.
 
Thanks for stopping by and good luck!!!!!
 
Thanks for stopping by.
 
Freda
 
Designed by:  Freda Cannon 
Machine Used:  Cricut Expression
Project Type:  Home Decor 
Products Used:  MTC Software; Happy Trails Svg files; Sasparilla Collection Paper by October Afternoon; Mod Podge; StazOn Ink; Photoshop Software; Panos FX actions for Photoshop; Tim Holtz Products: Typeset Alphabet, Tattered Banners and Grungeboard Heart, Martha Stewart Red & Gold Glitters, Glossy Accents, Twine and Jute. 

Tuesday, March 19, 2013

An Eggciting Little Project To Share

I've been so busy getting kits ready for the crop I'm going to this weekend that I haven't posted anything for a month...after this weekend I'll be posting lots of finished projects.....In the mean time here's my posting for the Cricut FANatics blog for March. 

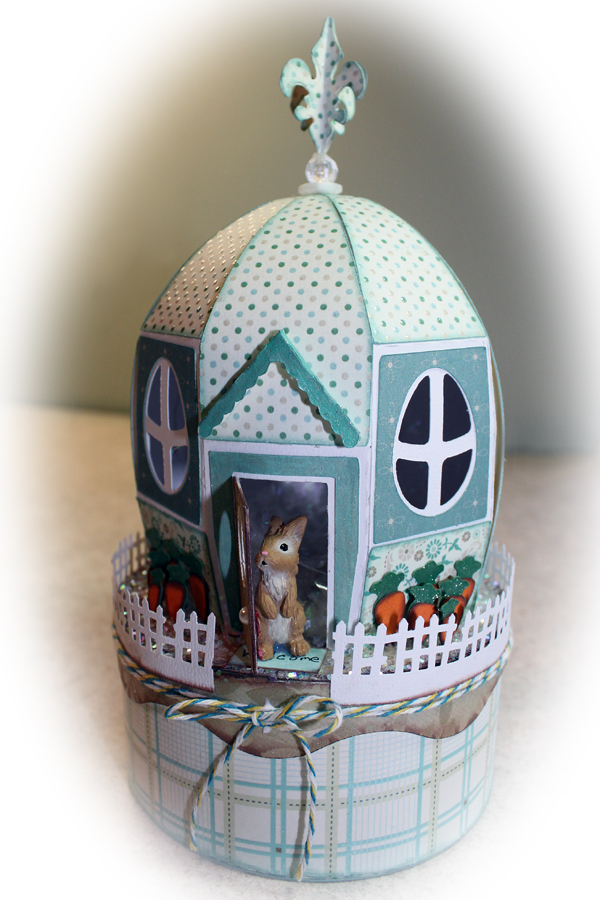
Hey there folks,  Freda from CannCreateDesigns here again to share another 3D project using MTC software and the Cricut Expression.  As soon as I saw the Cotton Tail Village set from SVGcuts I knew I had to make the egg box for you.

 
The base of the egg was cut from white cardstock from my stash, the panels were cut from a DCWV paper pack called "The Linen Closet" that I had purchased at Joann's the day before the cut files were released.  They worked out perfectly for this project.  After watching the assembly video on the SVGcuts website I cut everything out and laid it out to make sure that I have everything to get started.
 
I just realized that I didn't take any pictures of the box bottom and lid assembly for some reason but the assembly of the box bottom and lid are pretty clear on the website video if you need assistance...Next I chalked all the edges that need embellishing with coordinating colors of VersaMagic Dew Drops.  I love these chalks and have worn out more than a few of the Jumbo Java color which seems to go with everything vintage looking. 
 
 
After chalking the panels I begin assembling the egg base.  These panels cut with score marks for easy folding and are numbered so you don't have to guess which one is next.
 
For this particular project I found it easier to glue all of the points at the top and allow them to dry first, then glue the bottom part.  I used Clothes pins to help hold the pieces in place while gluing the next piece down, without the clothes pin they popped loose as soon as I moved to the next panel.  This just seemed easier to me because of the small  opening at the bottom and the stiffness of the cardstock I was using.
 
 
Once completed I thought it could use a little bling (of course).  So I added Doodlebug Design Sugar Coating Glitter around the top of the box. Made a little welcome mat, and added a Martha Stewart Border Punched Fence (think it was the Halloween one).  I found this little bunny at the TSC Farm store that was the perfect size, cut some carrots for a garden from the Create a Critter cartridge (cut at 6@ .75", 4@  .60",  2@ .5"). 
 
Inking those little carrots can be a pain...but I've figured out a way to do it a little easier with my tweezers...just pick it up and tap it onto the ink/chalk pad.  When the carrots are glued together put a blob of glue on the end and hold it in place on the box until it stands on it's own.
 
There was still something missing...a quick glance around my scraproom and I saw some twine that I tied around the lid and the Tim Holtz Mini Fleur die I had bought on clearance the day before.  I cut 4 fleurs, scored and glued them together.  Attached a button and a bead to the top of the egg.  After the glue in the bead/button piece dried I put glue on the end of the fleur and gently pushed the end into the hole in the bead.  Wallah!!! Finished....
 
 
I hope you like this project as much as I liked doing it...
 
Thanks for stopping by,
 
Freda

Tuesday, February 19, 2013

CraftRoom Freebies

CRAFTROOM FREEBIES
Hello again, it’s Freda from CannCreateDesigns here with two quickie projects using the Mini Books Project Cartridge and the Freebie Creative Cards preview that are free in the CraftRoom through the 20th.
It’s my son’s birthday next month and even though no one else in the family drinks coffee he has developed a taste for it. When I saw the Starbucks Lovers Gift Box on the Cricut With Heart Blog at Christmas time I printed out the page and put it in my “to make” pile for his birthday.

Using the Cricut Mini Books Project Cartridge I cut the outside layer only of the exploding box on pg. 11, scored the fold lines and inked all the folds on the inside and outside. To make this project even quicker I used coordinating double sided paper from my stash so I didn’t have to cut any panels to decorate it. I also used a couple of leftover stickers from my stash for decorating the top.

I suggest that you put the thicker objects on panels across from each other and the thinner items on the other 2 panels, that way when you close up the box the folded “wings” have somewhere to hide without distorting your box. I left these “wings” in to provide support since the gum and cookies are heavy. I stacked pop dots on the bottom of the cup until they were tall enough to stick to the center of the box bottom. The empty panel is waiting for a Starbucks Gift Card. They were out of the Happy Birthday ones the day I was in there getting the cup, samplers and gum.
 
The Banner came from the Artiste chipboard and stamp set that came with the cartridge (pop dot it up to make room for the ribbon to slide under). The cut itself is on page 35 cut at 1 ¼ “. I used a coordinating VersaMagic chalk round the edges of the banner. Butchers string was used as a ribbon since it matched the ribbons on the paper.
Next I decided to make a card from the Creative Card Freebies. When I first saw the samples I thought they were a little too plain for my taste so I wanted to “bling” one up to see if I would like it better. The card on the right was just cut and assembled. The card on the left was embossed, glittered, inked and bling’d up.


The extra bling didn’t take too long so I guess this cartridge would come in handy to use in a pinch when I needed a card quickly.
NOTE: I sized the card in CraftRoom to be a 4 ¼ x 5.5 and only cut the layers. I used up some of my stash of 8 ½ x 11 cardstock cut in half for the bases of the cards instead of cutting them on the cricut and I have tons of envelopes. Skipping those items saved a lot of time making these cards.

Thanks for stopping by,
Freda

Cricut Info and Other Supplies:
Designed by: Freda
Cartridges Used: Mini Books, Artiste, Creative Cards
Cricut Machines Used: CCR, Cricut E2
Other Supplies Used: card stock, distress ink, swiss dot embossing folder, Queen & Co Goosebumps & Rhinestone Trios, CTMH Artiste stamp set & chipboard, extra fine glitter.