Showing posts with label MTC. Show all posts

Sunday, May 19, 2013

3D Father's Day Gift Box


Here's my May posting for the Cricut FANatics Blog.....


Hi, it's Freda from CannCreate Designs, I'm back with a quickie 3D Father's Day gift box project using SVG files, MTC and my Expression. 

I was looking for a gift box for my hubby's father's day gift.  He has been wanting a new wallet so I though the size of this box would be perfect...


This project comes from "The Green Room" set at SVGCuts.com.  I was really amazed at how easy and quickly this project came together.

For the top I found this great green velvety specialty paper from HOTP called Forest Suede at my local LSS that cuts like butter.  Just to be certain I taped it down all the way around so I didn't waste an ounce......


I assembled the top before I decided the "balls" looked a little flat.  So I would advise that you assemble the rack of balls and embellish before attaching to the table....I was a little worried that I was going to mess up the suede.  Draw stripes and dots on the ball pieces, assembled rack base and frame then glued the balls in place on the rack base piece.  Place rounded blobs of Glossy Accents on each ball to make them look a little more realistic....let dry...


Use a tape runner adhesive to attach the velvet to the table top base. Next put the table top frame in place and embellish as desired.  (I put Queen & Co. black gems in the holes around the edges).  Draw the embellish lines (gold and black stripes) and color the chalk tip white on the stick, allow inks to dry then color the white tip with a little bit of blue on the end. Fold the stick along the scored lines and glue (it will be a square shaped tube). There are 2 holes in the suede to help with placement of the ball and stick, I placed a pearl on one and glued the stick to cover the other one...

Fold the sides of the table top under and glue in place.  Glue the "fringe" pieces along the long side (there aren't any pieces for the short sides of the top).  I put Queen & Co. large black pearls just above the holes cut in the fringe pieces.


For the bottom of the table fold the "Box" pieces and glue to form the table base, they are pretty self-explanatory.  Glue the 3 straight and scalloped trim layers together and glue in place on the leg pieces.  Attach the leg pieces to the long sides of the box.


Wallah....you're done....What Fella wouldn't enjoy getting a gift in something this special.....I thought this project was pretty special as a gift box...but last week someone made the bottom of the table and filled it with flowers to look like a planter-I thought it was even more amazing....check it out here...
  

Thanks for stopping by, 

Freda


Designed by:  Freda Cannon 
Machine Used:  Cricut Expression
Project Type:  3-D Gift Box
Products Used:  MTC Software; The Green Room SVG Files from SVGCuts.com, Glossy Accents, Queen & Co Pearls and Black Gems, Ink Gel Pens.

Tuesday, March 19, 2013

An Eggciting Little Project To Share

I've been so busy getting kits ready for the crop I'm going to this weekend that I haven't posted anything for a month...after this weekend I'll be posting lots of finished projects.....In the mean time here's my posting for the Cricut FANatics blog for March. 

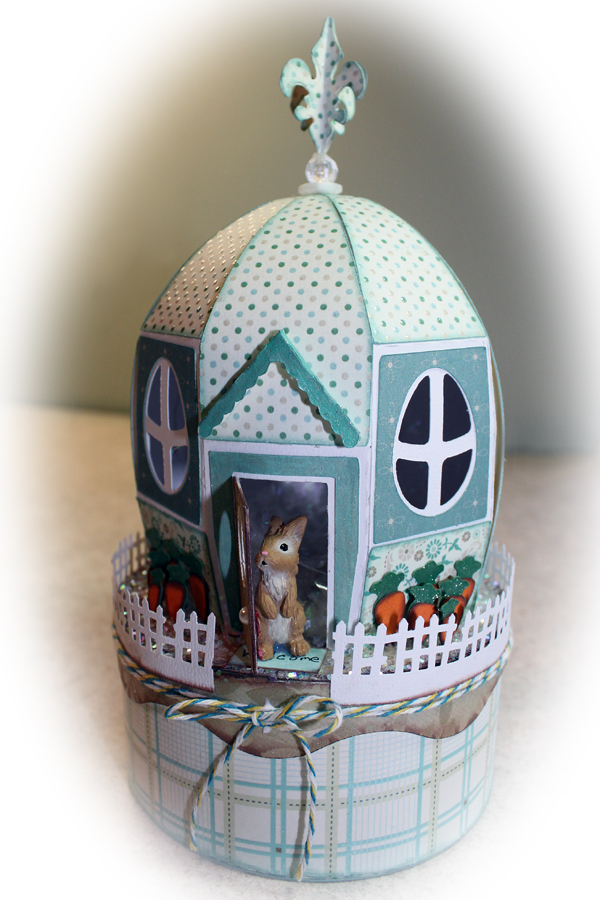
Hey there folks,  Freda from CannCreateDesigns here again to share another 3D project using MTC software and the Cricut Expression.  As soon as I saw the Cotton Tail Village set from SVGcuts I knew I had to make the egg box for you.

 
The base of the egg was cut from white cardstock from my stash, the panels were cut from a DCWV paper pack called "The Linen Closet" that I had purchased at Joann's the day before the cut files were released.  They worked out perfectly for this project.  After watching the assembly video on the SVGcuts website I cut everything out and laid it out to make sure that I have everything to get started.
 
I just realized that I didn't take any pictures of the box bottom and lid assembly for some reason but the assembly of the box bottom and lid are pretty clear on the website video if you need assistance...Next I chalked all the edges that need embellishing with coordinating colors of VersaMagic Dew Drops.  I love these chalks and have worn out more than a few of the Jumbo Java color which seems to go with everything vintage looking. 
 
 
After chalking the panels I begin assembling the egg base.  These panels cut with score marks for easy folding and are numbered so you don't have to guess which one is next.
 
For this particular project I found it easier to glue all of the points at the top and allow them to dry first, then glue the bottom part.  I used Clothes pins to help hold the pieces in place while gluing the next piece down, without the clothes pin they popped loose as soon as I moved to the next panel.  This just seemed easier to me because of the small  opening at the bottom and the stiffness of the cardstock I was using.
 
 
Once completed I thought it could use a little bling (of course).  So I added Doodlebug Design Sugar Coating Glitter around the top of the box. Made a little welcome mat, and added a Martha Stewart Border Punched Fence (think it was the Halloween one).  I found this little bunny at the TSC Farm store that was the perfect size, cut some carrots for a garden from the Create a Critter cartridge (cut at 6@ .75", 4@  .60",  2@ .5"). 
 
Inking those little carrots can be a pain...but I've figured out a way to do it a little easier with my tweezers...just pick it up and tap it onto the ink/chalk pad.  When the carrots are glued together put a blob of glue on the end and hold it in place on the box until it stands on it's own.
 
There was still something missing...a quick glance around my scraproom and I saw some twine that I tied around the lid and the Tim Holtz Mini Fleur die I had bought on clearance the day before.  I cut 4 fleurs, scored and glued them together.  Attached a button and a bead to the top of the egg.  After the glue in the bead/button piece dried I put glue on the end of the fleur and gently pushed the end into the hole in the bead.  Wallah!!! Finished....
 
 
I hope you like this project as much as I liked doing it...
 
Thanks for stopping by,
 
Freda