Tuesday, August 13, 2013

Rudolph Lighted Nose Ornament

While putzing around today doing laundry, cooking, cleaning and waiting for my Purchase Code to come through for my Cricut Circle Membership I decided to take a little break and play around with my Cricut Mini which happened to be the closest machine to me and the fact that I wanted to use up some of my 8.5x11 stash of cardstock that I'm slowly dwindling down. 

I have been seeing these tealight ornaments all over the internet and Pintrest, I don't know if anyone has made one from the Create A Critter cartridge but I thought I'd give it a try.  Here's the results...I think he's adorable!!  I used Create a Critter for Rudolph and CraftRoom Basics for the circle nose hole.


Click here if you'd like to download the CraftRoom files.  I needed 8 ornaments and that is how many I made the file for, delete any extras you don't need.

Assembly is pretty easy, be sure to line up the "nose" holes so you can insert the tealight through.  Glue the brown piece to the cream/tan layer, then glue those 2 pieces to the black layer, locate the hanger string where you want it on the white layer put a dab of glue to hold the ends in place and then glue the black/tan/brown layer over the string.  Add the red collar/ribbon last. 

After the paper layers are all assembled add your choice of adhesive that will hold the plastic tealight and paper pieces together around the top of the tealight.  Gently push the flame part of the tealight through the nose hole.  My light had a bent tip so I twisted the light until the tip faced upwards,  be sure to arrange the tip how you like it before allowing the adhesive to set up.  I used a piercing tool to push the edges around the hole back down flat then held the pieces in place until the glue set.

Enjoy...

Freda

Friday, July 19, 2013

Christmas in July

Here's my June post for the Cricut FANatics blog.....which is also my last posting.
 
Hey there, it's Freda from CannCreate Designs back with a little Christmas Holiday Cheer for you.  I  try to have a Christmas in July party at my house every year where I get together with some of the crafty members of my family and we make items that they can recreate at home  and give as gifts.  When I first started this we did it in late November/early December and they complained that they didn't have enough time to make the presents  for Christmas so we moved it to July.

I've been scouring Pinterest for ideas, any possible craft was pinned into my "Christmas in July Ideas" board.  I am writing this in April and I decided to make Snowmen gift boxes for each of the ladies.  Each box will hold an ornament for their tree. 

Okay, here goes....Today I am sharing a Snowman Giftbox using an SVG pattern I purchased from a company called My Scrap Chick .  They sell patterns for most cutting machine software formats and even in PDF for printing and hand cutting.  This Winter Patio Pavers pattern is their paper version of the patio paver blocks that people paint and make decorations out of.  There is also a card file included that matches, maybe I'll get time to make cards too...
 
First I cut out the files and sort the side pieces to the top and bottom of the box.  (the top side pieces of the box will be the two pieces with the 1/2 circle cuts in them.  To sort the top/bottoms inside/outside pieces you can stack all 4 cuts...the largest one will be the top/outside piece where the face/buttons go.  There will be 2 pieces that are the same size...one of those will be the inside of the top, it covers the area inside of the box top where the tabs are glued. The other will be the outside piece of the bottom.  The smallest piece that you have left will be the inside of the bottom, it covers the glued tabs on inside of the box bottom.  Clear as mud???  I'll try to explain in the pictures as you're assembling....  Be sure once you have sorted the pieces to separate them into the Top and Bottom sections, only work on one section at a time and keep them separated.  You might even write lightly in pencil on an area inside that will be hidden which pieces are which...if that will help you to keep them sorted.


Fold side pieces on the score lines, also fold tabs towards inside.


Note the slight size difference in this picture of the top inside and outside pieces...


We will assemble the sides first...I prefer that the end pieces without tabs be towards the inside of the box so I put glue on the inside of the tabbed piece and placed the untabbed piece so that it would be inside...wish I had taken pictures of that step....anyways you should wind up with a shape like this (bend the piece where the head/body join out so this shape is formed), I don't think it matters too much which side the untabbed piece is placed...just personal choice.


Now, making sure that you have the top outside and inside pieces and the side pieces with the 1/2 circles cut in it...apply glue to 3-4 tabs as illustrated below....


Using the top outside piece (the largest piece)...align and glue the tabs that have adhesive on them.  Hold each tab in place for a few seconds for the adhesive to set before attaching the next piece.  Work your way around the "bottom" of the snowman before gluing the head area tabs down.  You should have a piece like the one pictured below:
 

Now get one of the 2 same sized pieces, apply adhesive to the back of the piece (if you are using liquid glue do it sparingly and only around the outside edges to minimize waviness on your snowman top).   Apply this piece to cover where the tabs are glued inside.


Assemble the box bottom in the same manner...using the remaining pieces.  Your boxes should fit together like this:


Ink/Chalk in light blue or gray around the edges of the top of your box(the piece with the 1/2 circle cuts in it).  I prefer to chalk the "cheek" spots instead of using the circle cuts in the pattern, and also used black mini round gems by Recollections for the eyes.  Remember that you are going to be adding a ribbon to the area where the head/body join, so leave enough room below your  "Cheeks" so the ribbon doesn't hide your facial features.   Don't assemble your face and button pieces until after applying the ribbon.  Ink/Chalk the edges of the buttons, nose and stars in brown.  It's not pictured here, but I added little red "bling" dots to the stars-you can see them in the photo at the beginning of the post. 


Next tie your ribbon around the neck area of the snowman, turn the snowman around and cut the ribbon in half on the back side.  Apply adhesive to the back of the ends that you just cut.  Center the knot on the front of the snowman and bring the adhesive sides around to the inside of the lid to hide the ends.


Now add your face and buttons to the top of the box, and you're good to go...I hope you enjoyed this little "Christmas Break."


Thanks for stopping by, 

Freda

Designed by:  Freda Cannon 
Machine Used:  Cricut Expression
Project Type:  3D Gift Box
Products Used:  MTC Software; Winter Pavers file from My Scrap Chick; White cardstock with a few pieces from my stash; Assorted ribbon from my stash of swap items, Recollections Mini Round Gems from Michaels, Queen & Co bling.

Wednesday, June 19, 2013

My Favorite Layouts & Designer

This is my June Posting for the Cricut FANatics Blog...Enjoy
 
WARNING!!!  Making of the following layouts will result in "Bulky" Scrapbook Binders.....

I went to a crop a couple of months ago, crops are not really my favorite place to go to get work done because I like to "Social Butterfly" to see what everyone else is working on,.  but I go so my friend can have company.  I started cutting and putting together "Kits" in January so that I didn't have to drag much more than adhesives, bling and a basic tool kit.  Every piece/layer was totally embellished and just had to be attached to the layout.  I took 27 kits to assemble plus 5 or 6 of the 3D projects that I've posted on here earlier.  I got all the 3d projects completed and 18 of the kits put together that day.  I finished the other 9 kits the next day since hubby was out of town.  

Today I am going to show you the Cricut layouts that I put together there and a few that I have put together earlier and posted around here and there.  These layouts are a combination of freebies and purchased designs from Monique Griffith's  blog.  If you are interested in seeing her original designs, click the title and it will take you to the blog  page for that layout on her website.  I'm not selling anything or affiliated in any way, work and life keep me pretty busy and I just don't have time to sit around and guess what size to cut things at.  It's like buying a pattern for clothes...takes all the guess work out of it.

NOTE: she sells directions for cutting and assembling these projects for $5.  There are some posts with free directions for layouts (Home for the Holidays and Music to my Ears have directions posted for cutting sizes on the blog-just click their titles to go there), take a look around.  These are just some of the projects she offers.


This is the first layout I made using the free directions on the website.  The patterned papers were printed from the Christmas Wish Imagine Cartridge. The cuts are from the Winter Woodland and Everyday Paper Dolls Cartridged.  You might have seen this posted on my old blog or the cricut messageboards.  It was, and still is, my all time favorite layout.


I will never forget our miniature collie "Naboo" singing along every time my daughter practiced the flute.  (I got  Naboo the week that the Star Wars 1 was released, I had seen trailers for the movie and wanted to name her Jar Jar Binks soooo bad, but my family rebelled...Her official registered name wound up being Queen Amidala of Naboo).  This layout was perfect to record this memory as Naboo has left us.  I still have to finish the journalling in the ticket, one of these days........This layout was done using Mickey & Friends and the Quarter Note Cartridge and is Free also.


This layout was done using the A Child's Year Cartridge.  I just love all the details and vintage look to this page.  I substituted flowers from the Artiste cartridge for this layout, Monique made her flowers by hand cutting a spiral design in a circle.  I love the leaves at the bottom of the page, even though they were a pain.  I cut them,  misted them with water and perfect pearls, wadded them up in a paper towel, then opened the paper towel and let the dry, it was a nice day so I took them outside to dry in the sun.....from out of nowhere a quick breeze sprung up and blew them all over my yard,  my dogs thought I was playing a game and were so helpful in picking them up...lol


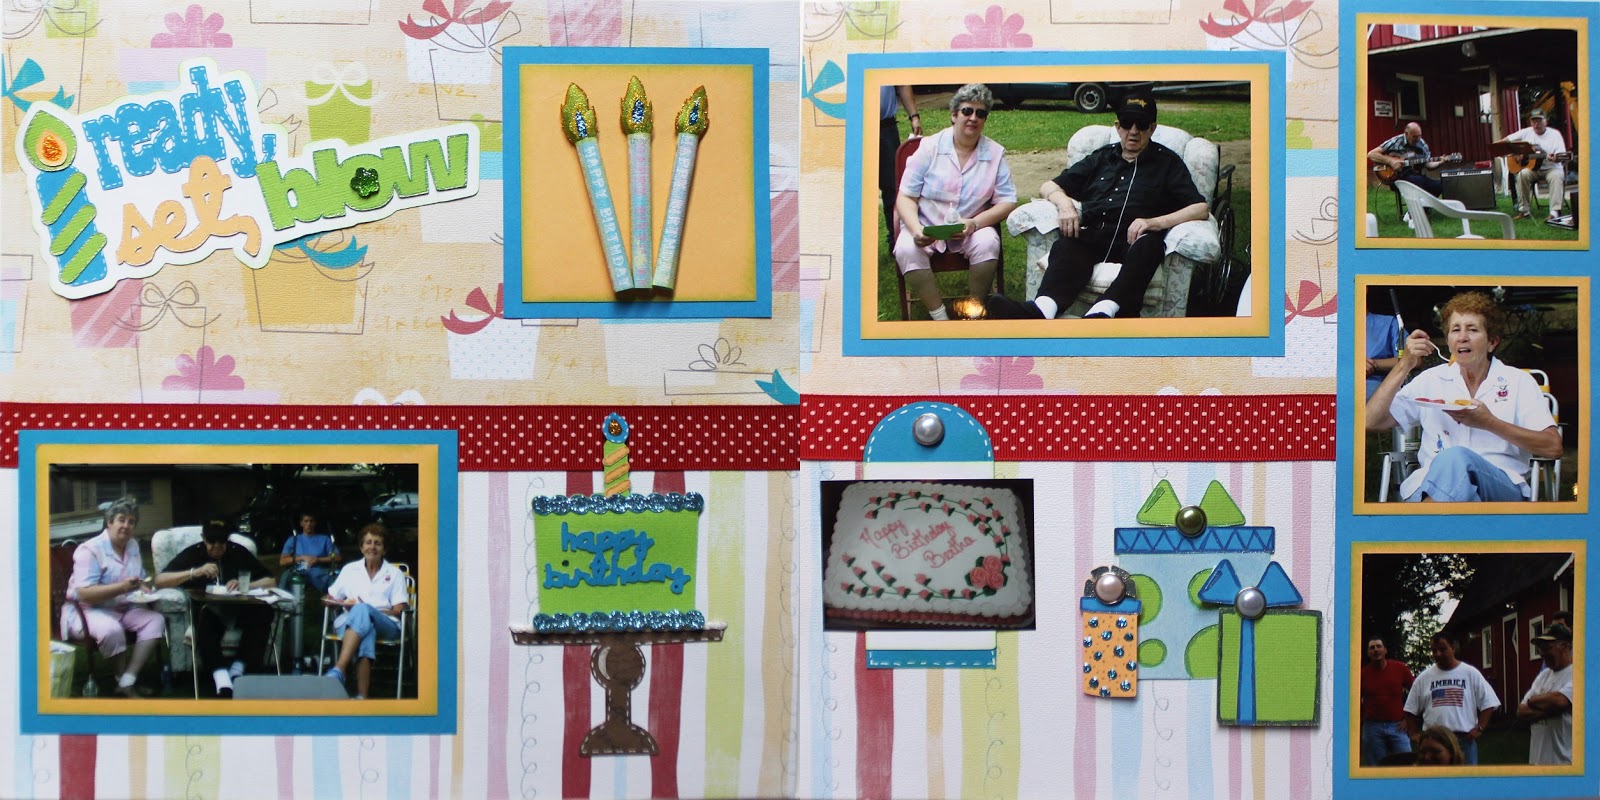
I used the Yummy Imagine Cartridge to print all the background papers.  I couldn't find anything I liked in my stash so I designed the diamond background and teal/black border piece in the Craft room and printed it.  The Diecuts were made using the Nifty Fifties Cartridge.

The old "Merc" in the photo's was our graduation gift to our son in 2002.  That's Dad, Grandpa and family friend "Uncle Harry" taking it for a cruise around the MIS raceway in Brooklyn, Michigan.  The guys really enjoyed that, as soon as I saw this layout I knew I had found the perfect layout for this memory.  The guys haven't said anything about the pink stuff in it, but I think they like it in spite of the pink.


The rest of the layouts were ones I worked on at the crop.  sorry for the funkiness in some of the pictures, I couldn't get the lighting to cooperate, of course it would help if I wasn't up in the middle of the night trying to take pictures with a glaring fluorescent light!
 

Used a tan and blue color scheme to make my version of this layout.


I love this color scheme, when I printed out my daughter's pictures in sepia tone they looked way to yellow so I did some research and found a "Bronzing" action for Photoshop.  It's hard to tell here because the lighting made the pictures look wonky, but that bronze color tone matches the background paper perfectly.
 
My grandson is a Lego Maniac, these are pictures from his birthday last year, he got enough money to buy the Millenium Falcon,.  It has more than 1,000 pieces to put it together.  


Originally designed for the Cricut Stampede, I changed the title to use for my grandson's pony birthday party...

I changed this layout around quite a bit.  Swapped out a lamp post for the signpost called for in the directions, I still need to add a wreath around it.  The light colored paper at the bottom was supposed to be at the top, didn't even notice it until I had the "hill" by the door glued down-no way to fix it so it was put together with an up-side-down background.
My grandson loves to play with that cork gun "Uncle Harry" bought him at Cabelas.  For this particular play session Connor, Dad and Papa all donned hats of some sort and had weapons, there we so many cute pictures that I wanted to include so I designed a mini flip book on the right page using zutter 4x6 photo pages.

 I trimmed the pictures down to size then trimmed the photo pages.  Next I tied ribbons in the rectangular openings to cover the binding holes.

When this page is inserted in the album, I have cut out an opening in the page protecrtor so that the album pages can be viewed without taking the page out of the protector...

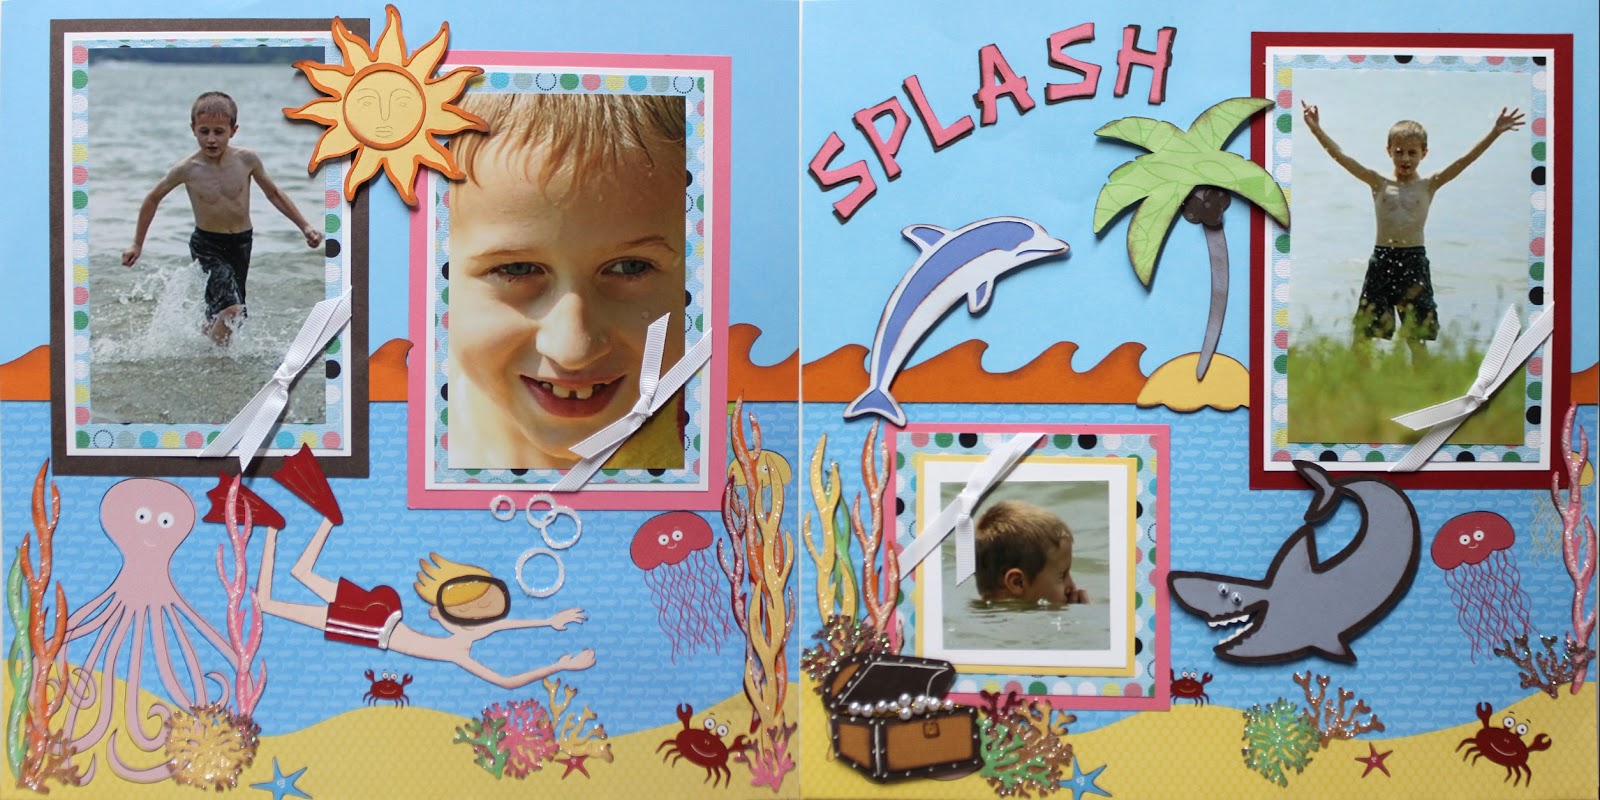
All Background Papers were printed using the Yummy Imagine Cartridge.  I Changed this up a bit because the layout would have been over busy if I used all the items called for in the directions.


My grandson's 2nd visit to a zoo, this time with his daddy...


These photo's were taken for my Photography class for various techniques


The Monsters, Inc. movie helped my grandson get over his fears about monsters under the bed and such.  He now knows that only the "Tickle" monster lives at Grandma's, all the other monsters are scared of our big dog.

The bottom background page was preprinted cardstock I bought at the fall crop in September. It fit perfectly with the theme and colors that were chosen for making this layout.
 
Grandson's first visit to the zoo with Grandma & Papa.  I love these pictures.  This was such a special day, it was the first time we took him on an outing.

***********
 
Love At First Sight


This layout is one I did at the crop and can share here because it has a Cricut cut on it.  The original came from the Close to my Heart Spring Summer 2013 catalog pg. 49.  I used some left over pieces of the Later Sk8r paper packages I had used to make his baseball and basketball layouts from.  I searched for the word Love and created at 1st sight with various fonts then manipulated the files in the Craft Room to weld together.  Since there wasn't a shadow for the words I had created, I used a trick Monique taught me about cutting a set in the color you want your shadow and offsetting them to create the appearance of a shadow.


It was Love at 1st Sight when Connor got to see his gift for his 2nd birthday (to stay at grandma's-mom & nana don't like dogs).  Grandma thinks all kids should have a pet to teach them kindness and responsibility and that is what he asked for as his gift. This is Snoopy the Rat Terrier who was only 3 weeks old when she traveled from Kentucky to Michigan to become Connor's best friend.  They have both grown over the last 6 years, Snoopy still loves Connor, but  wants to sleep after an hour of playing.  We got a big German Shepherd also that Connor can lay on  and play tug with, they both follow him around when he visits then stare out the window waiting for him to return when he leaves.  They are so adorable together.


Well, that's not all of them, but that's all I can share here.  I'll work on posting more on my blog over the next few months, so be sure to visit and subscribe to see what else I've come up with.  My crafting is expanding in a different direction that can't be shared here.  I've become obsessed with the Mixed Media Canvas stuff and have gotten quite a few "non" Cricut toys to play with.   I still use Cricuts, but am working with my other toys more because I've just been dabbling, but I really need to spend some time playing with it and learning to design my own projects.  

Unfortunately, next month's posting will be my final regular posting.  You're welcome to stop by my blog and see some of the new things I'm doing and learning.  I'll send postings to Deb occasionally when they are appropriate for this forum because I've got to many Cricut's just to let them sit idle. 

Freda
canncreatedesigns.blogspot.com

Sunday, June 16, 2013

Happy Father's Day...

Just hopping on here real quick to post some photo's of the Father's Day Card I made for my Hubby...The front cover was scraplifted from Tammy Tutterow's tutorial, I did swap out the Amelia Erhart stamp for the Charles Lindberg stamp.  The rest was my "fussing" until I liked it...

The front and back panels of the card.  When he opened it this morning he asked where I stole the book cover from.  So I must've done a pretty good job with the "faux leather" paper technique from Tim Holtz if it fooled my hubby. 

The front was from Tammy's tutorial online, the back was a necessity, the glue  bled through on the back side so I whipped up a tag to cover it...would've done some stamping on the back cover but Bob came home so I had to throw it together and be done with it.  This morning when I got up the fold area had peeled in places so I grabbed some black vinyl and applied it with liquid glass and heated to dry.  Maybe the paper wasn't dry enough from the faux leather technique but I had it out all night the night before with a fan blowing on it, I would've thought it would have dried.  I don't think I'll ever do this technique with folds in it again, would be easier to cut each piece and adhere with the liquid glass then put the vinyl on the fold areas.

The inside consist of a bunch of  a father's day sentiment and travel related stamps that were embossed with black embossing powder.  I used the spritz and flick technique to get the aged spots on the card.  I used the large manila tags for each side, scored them to make space for a pen because I wanted to buy one of those antigravity pens for him to use in the plane.  Unfortunately, every store around town has quit selling them and I didn't have time for delivery so it just became a card that looked like a book.
Thanks for stopping by,

Freda

Monday, May 27, 2013

More Tim Holtz Tags

I saw a tag sort've like this on Pinterest and liked it so I decided to recreate it my way with what I had on hand...


The background music was a freebie printable I found on Pinterest.  I printed it on white cardstock, sprayed it with workable fixative to seal the toner so I could ink and mist the card to age it.  You can download Silent Night and O Come All Ye Faithful  here .

The reindeer, 25 and ticket are all Tim Holtz Dies, the evergreen branch is a Spellbinders die.  One of these days I'll have to get me one of those Martha Stewart pine sprig punches...that thing would get worn out at my house..lol...

The layers behind the reindeer are a small doily with a punched circle of cardstock...I've permanently installed a sewing machine in my scrapbook room for a quick stitch around the cards and tags I'm making to add a little texture...

Thanks for stopping by...this will be the last post today, I've got to get going to a Memorial Day cookout at my son's house.

Have a great Memorial Day, and a huge thank you to all the men and women soldiers who defend our country everyday.  Hat's off to you all.

Freda

Prima Doll Mixed Media

Here's another quick project I did yesterday.  I got some of those Prima Doll Stamps and couldn't wait to play...

 
Bobby saw this and said she's creepy with no face...coming from him that is tooo funny considering his taste for zombies and all things Halloween.
 
The flowers were randomly cut circlish shapes then outlined with a black marker.  I used Queen and Co. straws for stems.  The quote is a Tim Holtz stamp.  Now that I look at it, the sun and rays are a little wonky, but that's what works with this type of art.
 
We'll see what I come up with next, I've got 2 more of these doll stamps to try out. I also want to make a background using my Gelli Plate...
 
 
Thanks for Stopping By
 
Freda

My First Mixed Media Canvas Projects...

I have become fascinated with some of the Mixed Media projects that I have been seeing around Pinterest.  Since I had many of the products already in my stash to try it without having to spend a bunch, I jumped right in.  I went around the house, yard and garage to pick of some "items" to include in my first project.  You never know what you'll find.  I came up with a shoebox full of items to choose from.

This first canvas is using a picture of Connor and Shadow.  I have wanted to scrapbook this picture with a title of "Me and My Shadow" since I took it.  Figured I'd use it for this project since it was one that really captures how close these two are.  It's hard to believe that he was scared of her as a puppy but 2 years later they are inseparable when he comes over.


I just glued a bunch of items that I found around the house/garage/yard to a canvas then started spraying inks and mists to create the Ombre colorization.  Couldn't make the transition from white to blue as well as the other colors transitioned so I decided to stop before I wound up with something I couldn't fix.


I used Puffy Stick On Letters to create the words Me and My Shadow. 
Mom thought I should highlight the words so they stood out more,
but I this type of project is supposed to be more like
an Eye Spy project, the more you look - the more you see.

These pictures were taken while it was hung on the wall so I couldn't get a very good picture of the top details so I took pictures of the bottom details just to show you the different "findings" I used.
There is a "Guardian Angel" pin  added over a heart to symbolize how protective Shadow is of Connor.  The Flower is an old button that was all scratched up, the stem is a dowel plug and the leaves are some jewelry beads.  under this corner I used a piece of cardboard that had the top layer torn to show the corrugation. 

Here I added a Tim Holtz Time clock.  The hands are pointed towards the 20 seconds at the bottom and 1 O'clock at the top.  They were set that say to document the year  2013 (1 o'clock is 13 hundred hours military time).  The Cherish tag was added last because I was too impatient to wait for things to dry and was using the heat gun, a little piece of the photo melted and had to be covered...I thought this tag would be appropriate.

This is the side of the canvas, there is a felt doghouse  and a doghouse charm, more buttons, beads, and other oddities you find in a junk drawer.  The "hook" on the bottom right is used for hooking the window shades strings to the wall.  I put it there so I can hang the "clicker" that we use when training the dogs...Connor loves to play hide and seek and would use the clicker to call the dogs when he was hidden


The texture on the photograph is from spraying polyeurathane on the whole piece to seal it.  This gives the picture that "mat" texture instead of a glossy finish.

This is the type of art that you either like or don't...and I'm really starting to like it a lot....so there will be more to come.

Freda

Sunday, May 19, 2013

3D Father's Day Gift Box


Here's my May posting for the Cricut FANatics Blog.....


Hi, it's Freda from CannCreate Designs, I'm back with a quickie 3D Father's Day gift box project using SVG files, MTC and my Expression. 

I was looking for a gift box for my hubby's father's day gift.  He has been wanting a new wallet so I though the size of this box would be perfect...


This project comes from "The Green Room" set at SVGCuts.com.  I was really amazed at how easy and quickly this project came together.

For the top I found this great green velvety specialty paper from HOTP called Forest Suede at my local LSS that cuts like butter.  Just to be certain I taped it down all the way around so I didn't waste an ounce......


I assembled the top before I decided the "balls" looked a little flat.  So I would advise that you assemble the rack of balls and embellish before attaching to the table....I was a little worried that I was going to mess up the suede.  Draw stripes and dots on the ball pieces, assembled rack base and frame then glued the balls in place on the rack base piece.  Place rounded blobs of Glossy Accents on each ball to make them look a little more realistic....let dry...


Use a tape runner adhesive to attach the velvet to the table top base. Next put the table top frame in place and embellish as desired.  (I put Queen & Co. black gems in the holes around the edges).  Draw the embellish lines (gold and black stripes) and color the chalk tip white on the stick, allow inks to dry then color the white tip with a little bit of blue on the end. Fold the stick along the scored lines and glue (it will be a square shaped tube). There are 2 holes in the suede to help with placement of the ball and stick, I placed a pearl on one and glued the stick to cover the other one...

Fold the sides of the table top under and glue in place.  Glue the "fringe" pieces along the long side (there aren't any pieces for the short sides of the top).  I put Queen & Co. large black pearls just above the holes cut in the fringe pieces.


For the bottom of the table fold the "Box" pieces and glue to form the table base, they are pretty self-explanatory.  Glue the 3 straight and scalloped trim layers together and glue in place on the leg pieces.  Attach the leg pieces to the long sides of the box.


Wallah....you're done....What Fella wouldn't enjoy getting a gift in something this special.....I thought this project was pretty special as a gift box...but last week someone made the bottom of the table and filled it with flowers to look like a planter-I thought it was even more amazing....check it out here...
  

Thanks for stopping by, 

Freda


Designed by:  Freda Cannon 
Machine Used:  Cricut Expression
Project Type:  3-D Gift Box
Products Used:  MTC Software; The Green Room SVG Files from SVGCuts.com, Glossy Accents, Queen & Co Pearls and Black Gems, Ink Gel Pens.